Framing a roof
|
Command |
Path |
|
Roof Framer |
AEC > Framing |
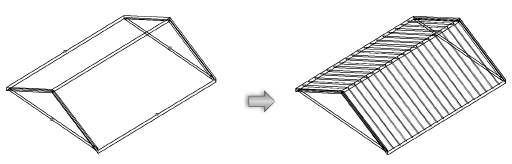
A roof object can be automatically framed with rafters, collars (collar beams), ridges, and other roof elements with the Roof Framer command. The command creates framing member objects. If Enable Auto-classing is selected in the Standard Naming dialog box, all roof framing members will be automatically placed in the Structural-Framing class.
This command does not work on roof face objects.
To automatically frame a roof:
Select the roof object.
Select the command.
The Roof Framer dialog box opens.
Select the tab for the type of roof framing element to create, and select the check box to create the framing element. More than one type can be selected at the same time; other framing elements can be added later.
An individual framing element can be added with the Framing Member tool, available from the Detailing tool set.
Enter the framing parameters for each desired framing element as described in the following sections.
Instead of aligning the framing to the top or bottom of the roof, the framing can be aligned to a roof component when components have been defined or when they are included as part of a roof style. Select Use Roof Components and then select the component for alignment from the Select Roof Component list.
For each selected roof framing element, click Object Attributes to specify its appearance.
The Attributes dialog box opens. See Applying object attributes for information on applying graphic attributes, and Managing object textures from the Object Info palette for information on texture parameters.
Click to show/hide the parameters.Click to show/hide the parameters.
|
Parameter |
Description |
|
Graphic Attributes |
Each graphic attribute can be set by the class style or to specific settings. If set by the class style, the attributes are controlled by the class selected in the Roof Framer dialog box for the framing element. |
|
Fill |
Select a fill style, or select Class Style to set the fill attributes by class. Depending on the Style selected, select a color, pattern, or resource (hatch, image, gradient). |
|
Pen |
Select a pen style, or Class Style to set pen attributes by class. Depending on the Style selected, select a color, pattern, or line type resource. |
|
Line Thickness |
Select the line thickness; to use a custom thickness, select Set Thickness from the line thickness list (see Line thickness attributes) |
|
Texture |
Select Class to use the class texture for the framing element (see Concept: Applying textures by class), or choose Select to select the texture from the Resource Selector and set the texture parameters |
|
Map Type |
Select the texture map type |
|
Radius |
For sphere and cylinder maps, sets the texture radius; the default radius is the same as the 3D object radius. Increasing this value reduces the size of the texture on the object. |
|
Start/End Cap |
Applies the texture to the start and end caps of the framing element |
|
Repeat Horizontally/ Vertically |
Repeats the texture in a horizontal and/or vertical direction |
|
Scale Factor |
Enter a scale value to determine the texture size when projected onto the object |
|
Horizontal/Vertical Offset |
Sets the start location of the texture horizontally and vertically |
|
Rotation |
Sets the angle of texture rotation; enter a rotation value from 0 to 360 degrees |